epsxy

about

03 Aug 2020

Home Automation with Raspberry Pis

Introduction

I have a Raspberry Pi model 3 buried under my desk for 2 years, and I don’t know what to do. I was not really interested in building a gaming pi with Retropie, nor a NAS server. The only project which was interesting to me at this time was pi-hole. But I did nothing. Thus, in the past few weeks, I have decided to dig into it and to find something to do with it: a home automation project. I wanted to track some data in my apartment, such as temperature, humidity, and front door opening (for security purposes).

Hardware

I have used the following hardware:

  • 1x Rapsberry Pi Model 3B
  • 1x Rapsberry Pi Model 4B
  • 1x Raspberry Pi Zero Model WH (with GPIO pins)
  • 1x Hall effect switch: electronic component which returns either 0 or 1 whether a magnetic field is aplied or not.
  • Some neodymium magnets (for Hall effect switch). Basically, you put your Hall effect switch on the wall and the magnet on the door. When the door is opened, the magnetic field disapear and the sensor value change. When the door is closed, the field is re-applied, and the value change again. Thus, you can register open -> close and close -> open transitions.
  • 3x DHT11 Temperature/Humidity sensors: cheap sensors returning humidity and temperature measurements. They are not super precise, and you should probably consider buying better ones if you need more precision regarding your temperature and humidity tracking.

Software conception

The main idea was:

  • Measure sensor values
  • Save all the values in realtime
  • Access to the data in realtime throught a webapp
  • Get notifications for some events (door has been opened for example)

I have decided to:

  • Use python for all the sensor measurements. These python scripts would run as daemons on a light (and cheap) Raspberry Pi Zero WH.
  • Use RethinkDB, a realtime database, for pushing on the fly the sensor values. This database would be hosted on a more robust Pi, the Raspberry Pi 4, because it’s an activity more demanding.
  • Use a classic webapp architecture client (Angular) / server (Python FastAPI) server for the dashboard logging the data.
  • For notifications, I have tried several things. First, I have started with SMTP email notification, through a dedicated gmail account. Python scripts will SMTP-authenticate and send me some email when a specific event occur. I have also used Gmail Bot for Telegram, to be able to receive these notifications as direct messages as well. But I was not really happy of being ‘spammed’ that much by email. I have decided afterwards to develop and use a private Discord bot, running as a service on the Raspberry Pi 4 as well. This bot will be able to respond some commands and to give me the last expected values for each measure. For example !temperature would return last temperature measured by the sensor etc. We could also imagine using these commands to make measures the moment we request it, but I have configured my sensors to take measurements every hour. That precision was sufficient to me.

System architecture

Network

docs/pi-dht11-hall.png

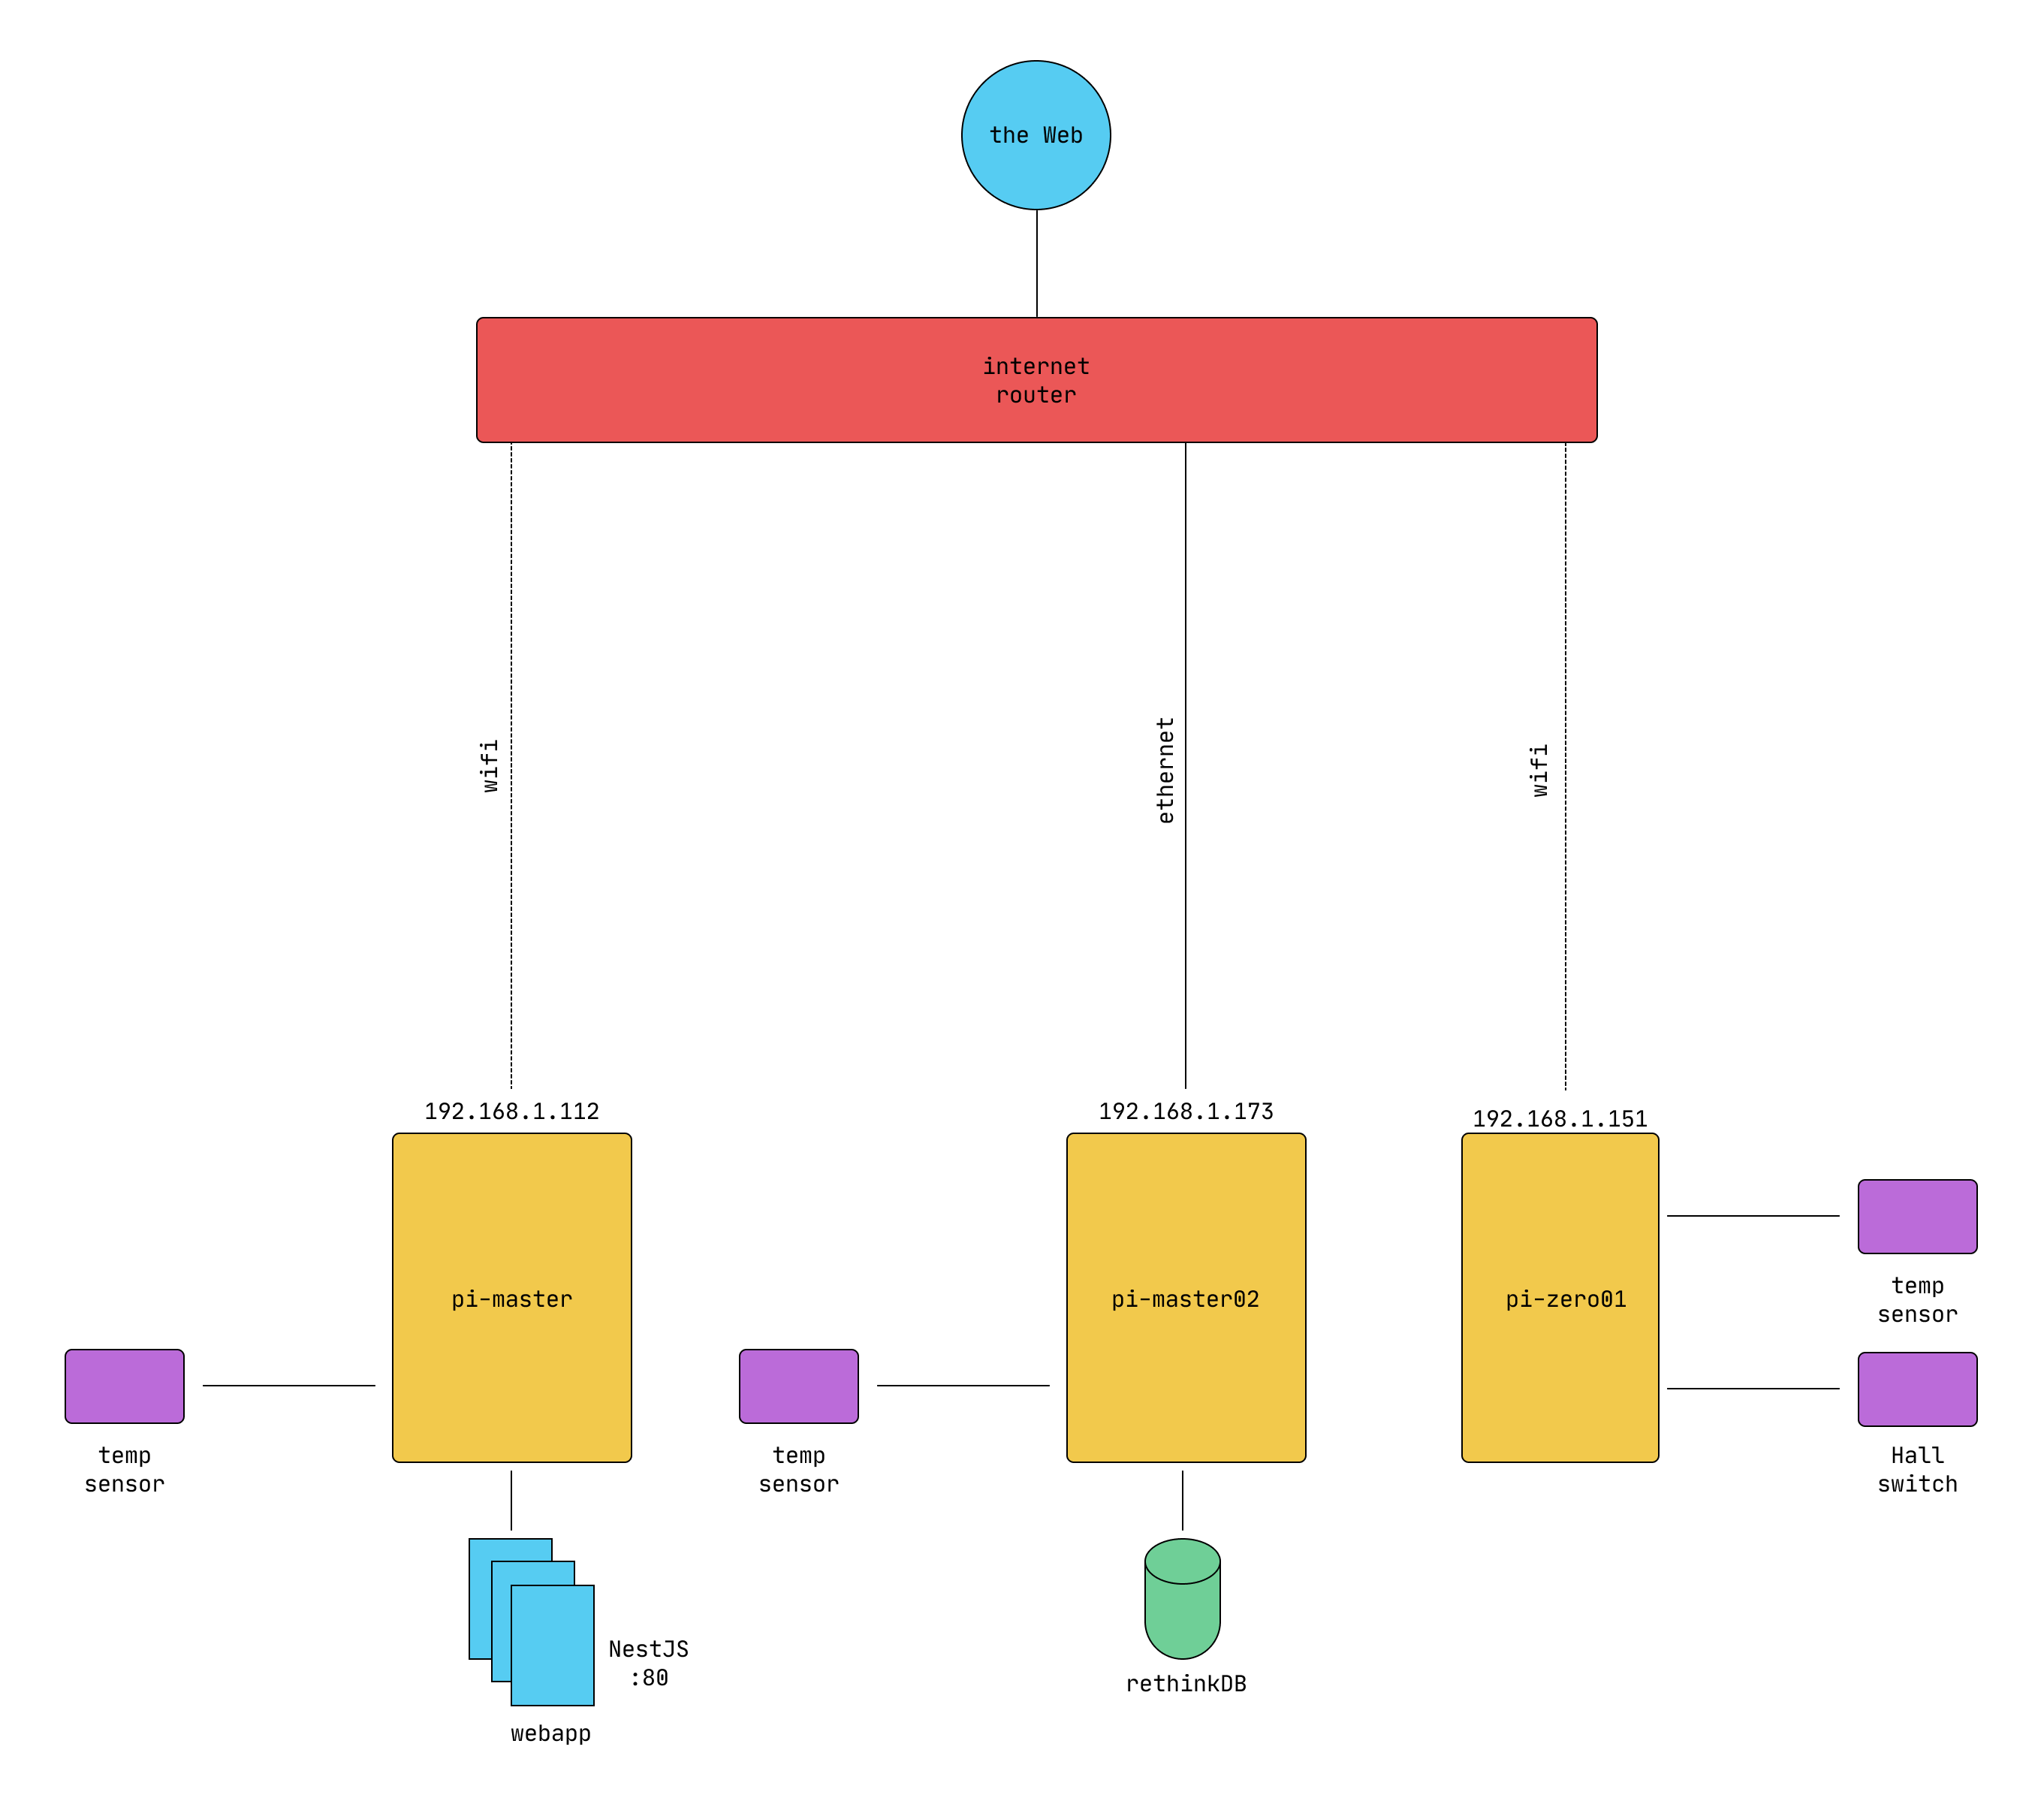
Connect sensors to the Raspberry Pi

The sensors I have bought can both be connected to +5 input (VCC). GND must be connected to the ground. OUT cable must be connected to a GPIO pin. I have chosen GPIO 2 for DHT11 sensor and GPIO 18 for hall effect switch.

docs/pi-dht11-hall.png

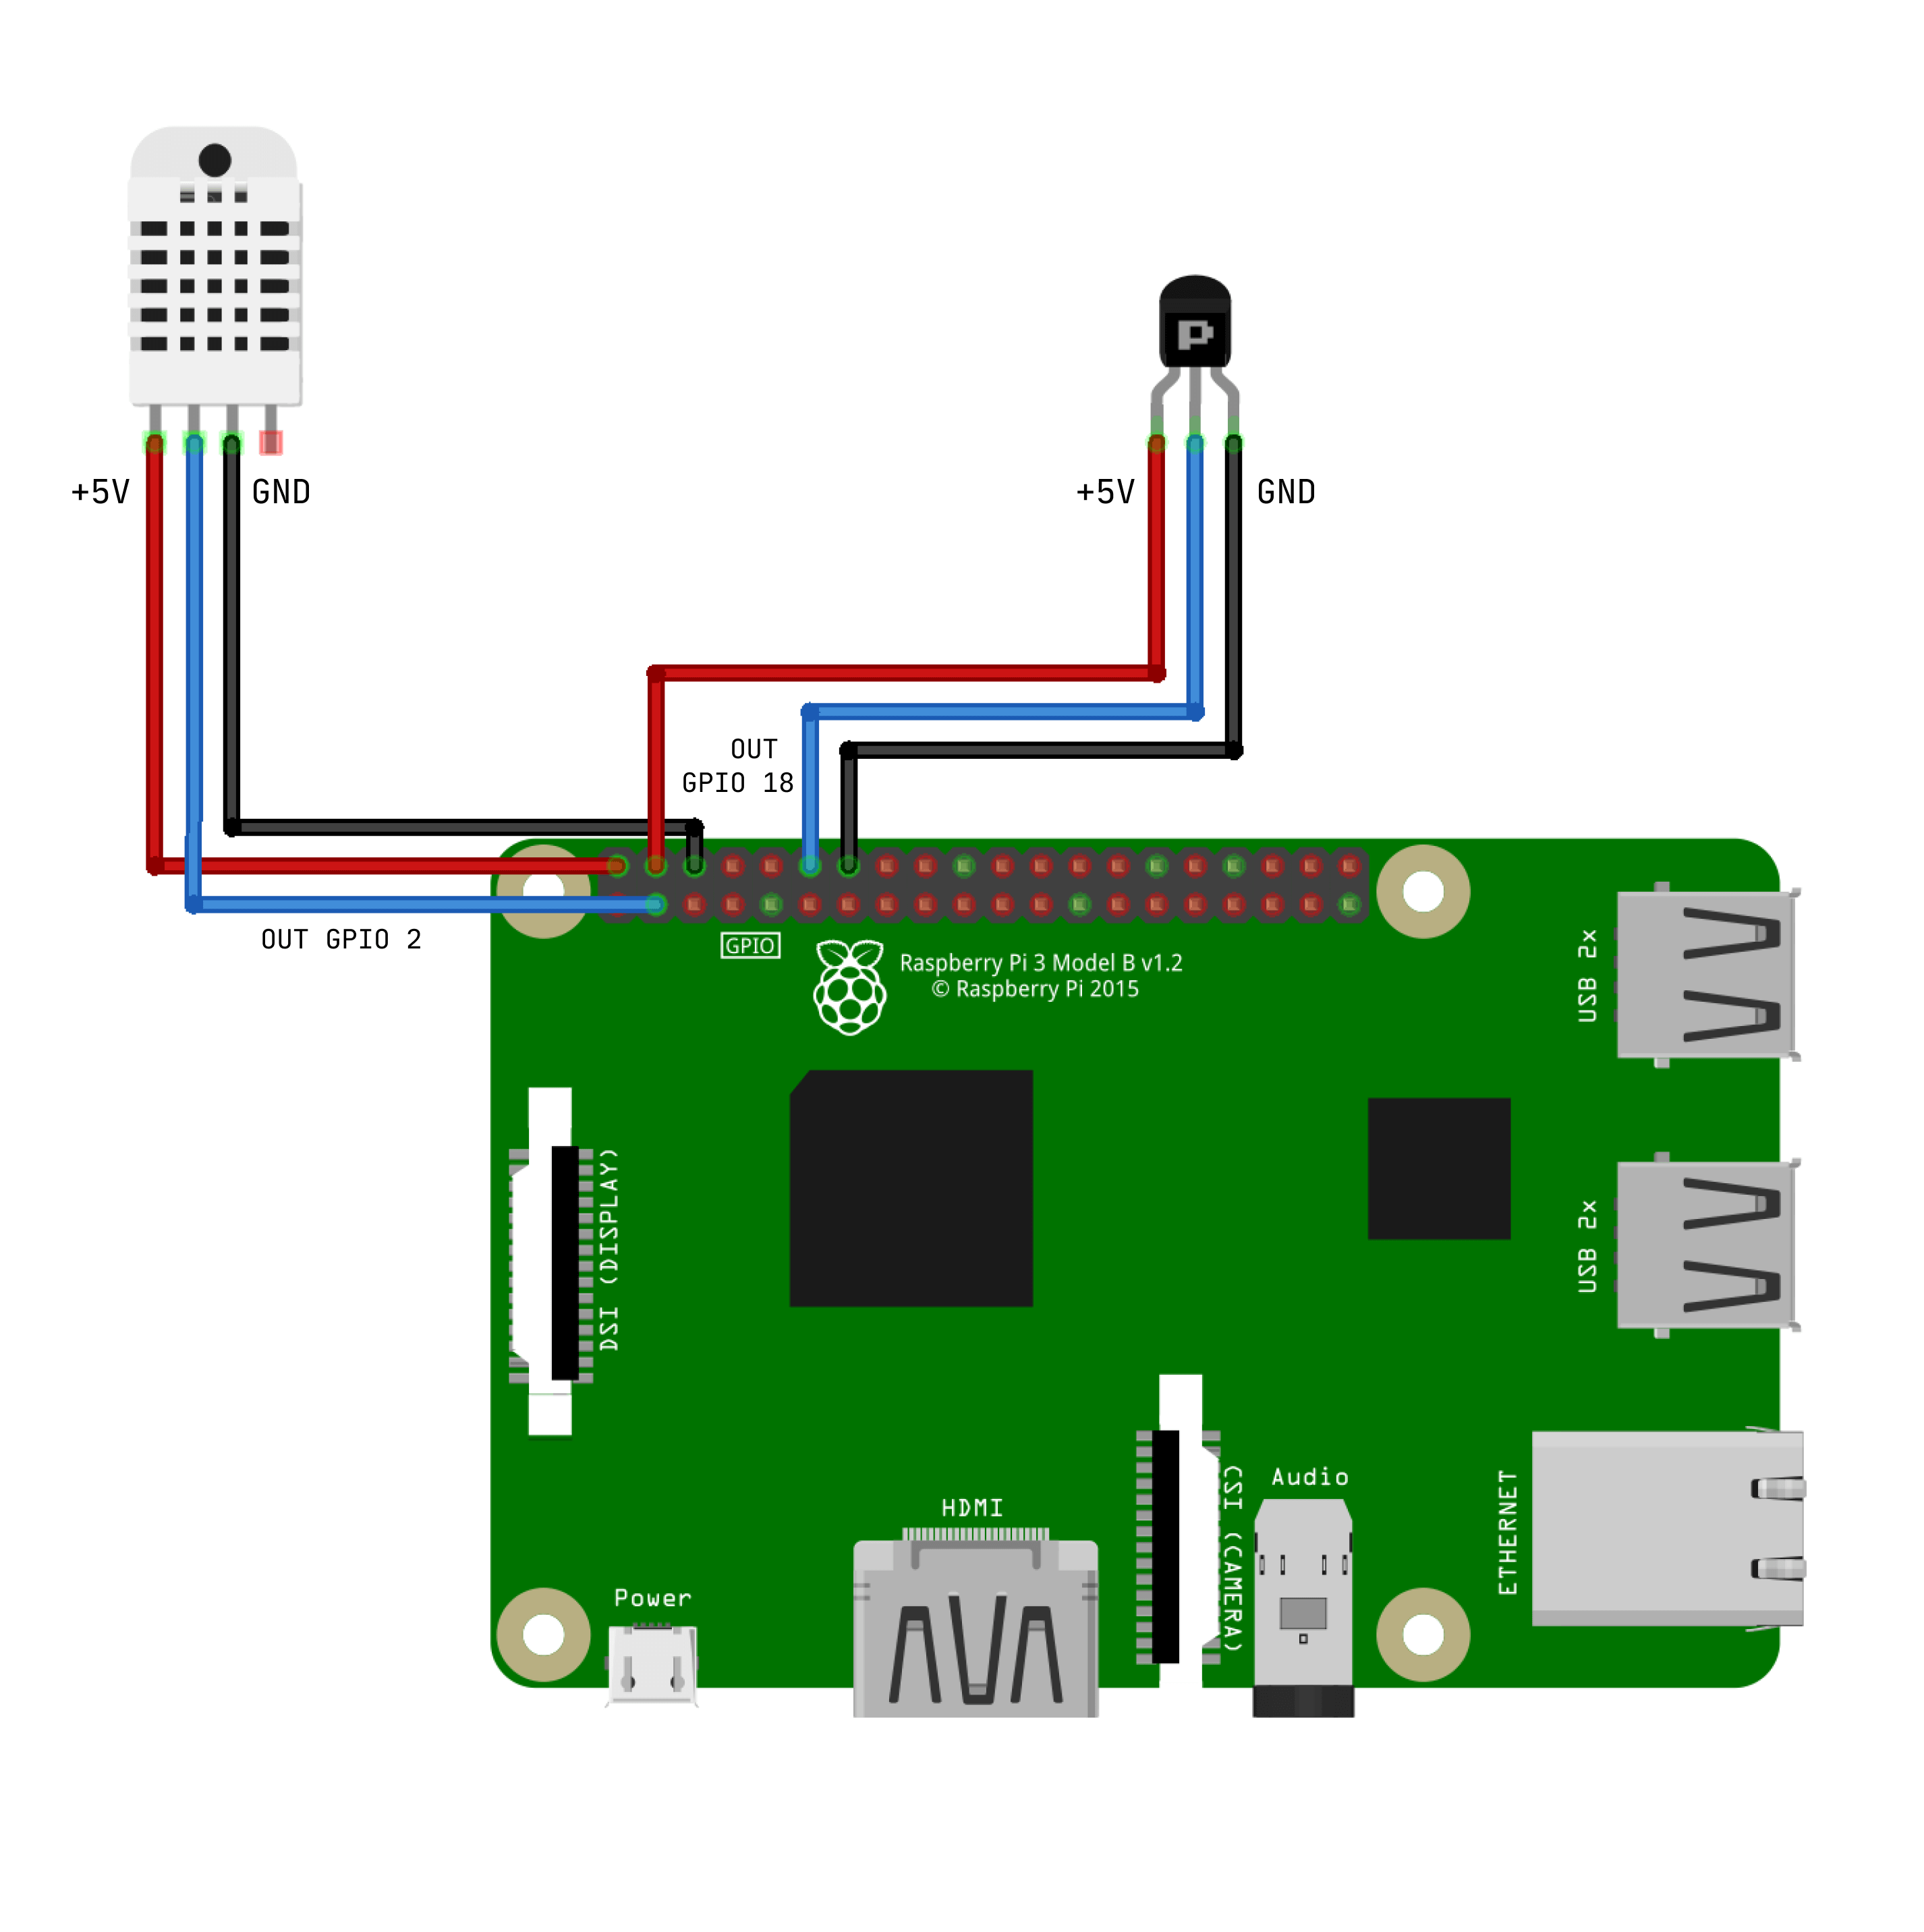
You can see the GPIO pin map by typing pinout in a shell, on a Raspberry Pi.

> pinout
,--------------------------------.
| oooooooooooooooooooo J8 +====
| 1ooooooooooooooooooo | USB
| +====
| Pi Model 3B V1.2 |
| +----+ +====
| |D| |SoC | | USB
| |S| | | +====
| |I| +----+ |
| |C| +======
| |S| | Net
| pwr |HDMI| |I||A| +======
`-| |--------| |----|V|-------'
Revision : a02082
SoC : BCM2837
RAM : 1024Mb
Storage : MicroSD
USB ports : 4 (excluding power)
Ethernet ports : 1
Wi-fi : True
Bluetooth : True
Camera ports (CSI) : 1
Display ports (DSI): 1
J8:
3V3 (1) (2) 5V
GPIO2 (3) (4) 5V
GPIO3 (5) (6) GND
GPIO4 (7) (8) GPIO14
GND (9) (10) GPIO15
GPIO17 (11) (12) GPIO18
GPIO27 (13) (14) GND
GPIO22 (15) (16) GPIO23
3V3 (17) (18) GPIO24
GPIO10 (19) (20) GND
GPIO9 (21) (22) GPIO25
GPIO11 (23) (24) GPIO8
GND (25) (26) GPIO7
GPIO0 (27) (28) GPIO1
GPIO5 (29) (30) GND
GPIO6 (31) (32) GPIO12
GPIO13 (33) (34) GND
GPIO19 (35) (36) GPIO16
GPIO26 (37) (38) GPIO20
GND (39) (40) GPIO21

Software development

Sensors

Developing for sensors essentially depends on how they are going to send the data. Both the sensors I have bought use 2 different strategies to send data throught the GPIO pin. The hall sensor is either returning 0 or 1 if the sensor detects a magnetic field or not. It’s more complicated for the DHT11 sensor, since the data is sent in a specific format. For this sensor, I have used the Adafruit_DHT python library which already implement methods to read inputs in the DHT11 format: humidity, temperature = Adafruit_DHT.read_retry(sensor, pin).

My implementation consists basically in:

  • reading the .env file for the environment variables
  • initialising the database connection throught an homemade RethinkDB wrapper
  • reading the sensor in an infinite loop every n seconds.

Depending on the environment variables, we can send emails with the notifications, save the information in the database, log the data, etc.

Below, an example of implementation for the DHT11 sensor.

Development

python
import Adafruit_DHT
from datetime import datetime
from rethinkdb import r
from dotenv import load_dotenv
from model.redb import ReDB
import time
import os
# Read sensor data
def read_temp_sensor(sensor, pin: int):
humidity, temperature = Adafruit_DHT.read_retry(sensor, pin)
if humidity is None or temperature is None:
pattern = 'Sensor got faulty values: ({},{}) as (*C, %)'
print(pattern.format(temperature, humidity))
read_temp_sensor()
else:
return temperature, humidity
# Wrapping posting results to database
def post_db_result(db: ReDB, temperature: int, humidity: int):
r.db('dashboard').table('temperatures').insert({
'timestamp': r.expr(datetime.now(r.make_timezone('+02:00'))),
'location': 'LIVING_ROOM',
'value': temperature
}).run(db.get_conn())
r.db('dashboard').table('humidity').insert({
'timestamp': r.expr(datetime.now(r.make_timezone('+02:00'))),
'location': 'LIVING_ROOM',
'value': humidity
}).run(db.get_conn())
# Main function
def run(db_host: str, db_port: int, is_logger_enabled: bool,
is_db_enabled: bool):
sensor = Adafruit_DHT.DHT11
pin = 2
database = ReDB(db_host, db_port)
if(is_db_enabled):
print('DB {}:{} enabled'.format(database.host, database.port))
database.connect()
while True:
temp, humidity = read_temp_sensor(sensor, pin)
if(is_logger_enabled):
print('{}*C, {}%'.format(temp, humidity))
if(is_db_enabled):
post_db_result(database, temp, humidity)
# Wait 1h between each measure
time.sleep(3600)
if __name__ == '__main__':
load_dotenv(verbose=True)
# SMTP configuration
mail = os.getenv('SMTP_MAIL')
pwd = os.getenv('SMTP_PWD')
port = 465
is_mail_enabled = os.getenv('NOTIFICATION_ENABLED') == 'True'
# Logger configuration
is_logger_enabled = os.getenv('LOG_ENABLED') == 'True'
# DB configuration
is_db_enabled = os.getenv('DB_ENABLED') == 'True'
db_host = os.getenv('DB_HOST')
db_port = os.getenv('DB_PORT')
run(db_host, db_port, is_logger_enabled,
is_db_enabled)

Deployment

These sensors can by deployed and ran using systemd.

bash
# ---- content of /etc/systemd/system/sensor.dht11.service ----
[Unit]
Description=DHT11 sensor service
After=network.target
[Service]
User=${USER}
Restart=always
Type=simple
WorkingDirectory=/path/to/python/repo
ExecStart=/path/to/pipenv run python3 -u /path/to/python/repo/dht11.py
[Install]
WantedBy=multi-user.target

See below parts for examples of systemd commands and usage.

RethinkDB

Installation

RethinkDB’s installation may be a bit challenging because you have to download sources and compile it from them. You may go through some issues depending on the compiler you are using.

bash
# Install dependencies
> sudo apt-get install g++ protobuf-compiler libprotobuf-dev libboost-dev curl m4 wget libssl-dev
# Install clang
> sudo apt-get install clang-9
# Configure clang
> sudo alias /usr/bin/clang++-9 /usr/bin/clang++
# Get rethinkdb sources
> wget https://download.rethinkdb.com/repository/raw/dist/rethinkdb-2.4.0.tgz
> tar xf rethinkdb-2.4.0.tgz
# Build
> cd rethinkdb-2.4.0
> ./configure --allow-fetch CXX=clang++
> sudo make install
# Test if installation has been successfull
> rethinkdb

Bonus: If you want to access RethinkDB web UI from another computer within your home network, by typing in your browser http://<SERVER_IP>:8080, it seems you have to start rethinkdb using --bind all option, i.e. rethinkdb --bind all.

Deployment

I use Systemctl to run RethinkDB as a daemon. Create the following file at /etc/systemd/system/rethinkdb.service by replacing ${USER} by the user which needs to run RethinkDB:

bash
# ---- content of /etc/systemd/system/rethinkdb.service ----
[Unit]
Description=Rethinkdb service
After=network.target
[Service]
User=${USER}
Restart=always
Type=simple
WorkingDirectory=/home/${USER}
ExecStart=/usr/local/bin/rethinkdb --bind all
[Install]
WantedBy=multi-user.target

You have to restart daemon with sudo systemctl daemon-reload and run the service with sudo systemctl start rethinkdb. You can verify it’s started:

bash
> sudo systemctl start rethinkdb
> sudo systemctl status rethinkdb
● rethinkdb.service - Rethinkdb service
Loaded: loaded (/etc/systemd/system/rethinkdb.service; disabled; vendor preset: enabled)
Active: active (running) since Thu 2020-07-23 18:59:55 CEST; 1 weeks 1 days ago
Main PID: 7260 (rethinkdb)
Tasks: 73 (limit: 3862)
CGroup: /system.slice/rethinkdb.service
├─7260 /usr/local/bin/rethinkdb --bind all
└─7276 /usr/local/bin/rethinkdb --bind all
juil. 23 18:59:55 pi-master02 systemd[1]: Started Rethinkdb service.

Discord bot

Development

After creating a discord bot as an application in Discord Application page, you can generate a token and use it to identify your bot. I have decided to create the bot in python and thus, to use the discord.py library. Below, you can see the code for a simple bot, listening to some client messages and reading the database depending on the message sent by the client.

python
import discord
import os
from rethinkdb import r
from dotenv import load_dotenv
load_dotenv(verbose=True)
# Read .env variables
db_host = os.getenv('DB_HOST')
db_port = os.getenv('DB_PORT')
token = os.getenv('DISCORD_TOKEN')
# Init client
client = discord.Client()
# Connect to Rethinkdb
conn = r.connect(db_host, db_port).repl()
def get_temperature():
cursor = r.db('dashboard') \
.table('temperatures') \
.order_by(r.desc('timestamp')) \
.run(conn)
return cursor[0]['value'], cursor[0]['timestamp']
def is_me(m):
return m.author == client.user
@client.event
async def on_ready():
print('We have logged in as {0.user}'.format(client))
@client.event
async def on_message(message):
if message.author == client.user:
return
if message.content.startswith('!temperature'):
value, ts = get_temperature()
pattern = 'Temperature: {}°C ({}-{}-{} {}:{})'
await message.channel.send(pattern.format(
value,
ts.year,
ts.month,
ts.day,
ts.hour,
ts.minute
))
if message.content.startswith('!clear'):
await message.channel.purge(limit=100)
if __name__ == '__main__':
# Start client
client.run(token)

Deployment

Like our other services, we can deploy the discord bot using systemd, after describing the service in a dedicated file located at /etc/systemd/system/discord.bot:

bash
# -------- content of /etc/systemd/system/discord.bot --------
[Unit]
Description=Discord bot service
After=network.target
[Service]
User=${USER}
Restart=always
Type=simple
WorkingDirectory=/path/to/python/repo
ExecStart=/path/to/pipenv run python3 -u /path/to/python/repo/bot.py
[Install]
WantedBy=multi-user.target
bash
> sudo systemctl start discord.bot
> sudo systemctl status discord.bot
● discord.bot.service - Discord bot service
Loaded: loaded (/etc/systemd/system/discord.bot.service; disabled; vendor preset: enabled)
Active: active (running) since Sun 2020-07-26 23:19:11 CEST; 5 days ago
Main PID: 28136 (python3)
Tasks: 22 (limit: 3862)
CGroup: /system.slice/discord.bot.service
└─28136 /home/${USER}/.local/share/virtualenvs/discord-L7UosTov/bin/python3 -u /home/${USER}/path/to/repo
juil. 26 23:19:11 pi-master02 systemd[1]: Started Discord bot service.
juil. 26 23:19:13 pi-master02 pipenv[28136]: Loading .env environment variables…
juil. 26 23:19:17 pi-master02 pipenv[28136]: We have logged in as HomeBot#5246

Bonus

Before using a Discord bot, I was working on email notifications. This was working quite nicely but this is a bit less user-friendly because this kind of notifications create a lot of spam emails. Below, you can find a wrapper for sending emails throught SMTP in python, using smtplib.

python
import smtplib
import ssl
class Notifier:
ctx = None
mail_srv = 'smtp.gmail.com'
mail = None
pwd = None
port = None
"""
Quota for avoiding to spam emails in case of an issue in the code.
Sending too much email can cause your account being banned by your
email provider. I should probably reset this value every day or every x hours.
For now, we have to restart service to reset this value.
"""
quota = 10
def __init__(self, mail: str, pwd: str, port: int):
self.ctx = ssl.create_default_context()
self.mail = mail
self.pwd = pwd
self.port = port
def send_mail(self, subject: str, content: str):
message = 'Subject: {}\n\n{}'.format(subject, content)
with smtplib.SMTP_SSL(
self.mail_srv,
self.port,
context=self.ctx) as srv:
if(self.quota > 0):
self.quota = self.quota - 1
print('new quota is {}'.format(self.quota))
srv.login(self.mail, self.pwd)
srv.sendmail(self.mail, self.mail, message)
else:
print('quota exceeded, email not sent')

Conclusion

In conclusion, we have today created a home monitoring system for:

  • Measuring some data with dedicated sensors (temperature, humidity, door opening)
  • Storing the data in a realtime database
  • Reading the data and sending it throught a Discord bot when requested by an user command

I am still working on some things such as async push notifications using Discord (to send messages without user command on discord), to monitor the front door of my house. I am also still working on a webapp to display measures in realtime. I am planing to display it permanently using a Raspberry Pi, and a monitor I already owe.

You can find the code of this project on the dedicated Github repository.